
LAYERS OF COLOR – an online painting workshop * This workshop is just that…a fun, informal, information-packed series of written blog posts, step-by-step photos, and demo videos. I will share my own personal methods for layering color and creating vibrant artworks. Get familiar with my style before signing on to be sure this is what you’d like to learn. I will share my personal favorite supplies, techniques and ideas. The workshop is not meant to take the place of formal art classes.
INTRODUCTION:
Welcome everyone! i am so excited and so nervous to host my very first workshop! i thank you all for jumping on board with me and i hope we can all do some learning from each other these next several weeks. i have worked super hard to make sure you will all get value from the demos & examples and instruction. By the end of the workshop, you should really be inside my head (scary!- haha) and have tons of practical knowledge about how i approach my artwork and get the results that define my style and aesthetic. Then once you know it, throw it all out the window and only apply what speaks to you and your own personal taste. It’s the idea of learning rules so you can break them. i am so happy to show you just how i work. But of course, encourage you to find your own voice and ways of expressing yourselves through your art when all is said and done.

ABOUT ME: i’m sure some of you know me from following my blog or facebook page, but some of you may not. i am a heart-on-my-sleeve kind of girl. i’m an open book. i cannot keep a secret to save my life….unless it is someone ELSE’s secret, and then i am a vault! i love to work with kids more than anything and i love to encourage them to be wild and crazy in their self expression. You can see that in my own artwork, i think. i am 39 years old and a mom to 3 little boys.i am 6’1″ tall with long strawberry blonde hair and freckles, freckles, freckles. i hate tight clothing, so i am always wearing dresses over baggy jeans or stretchy jeans. My feet are bare 90% of the time despite living in a pretty chilly climate most of the year! i am a workaholic and a serial DIYer. There is ALWAYS a project in motion on our house. ALWAYS. Right now we are about to build a studio space onto our little house because i’ve been hogging a much-needed bedroom. We haven’t even broken ground on the studio yet, and i am already getting the next project in my head! Let’s see…what else? i eat chocolate pretty much everyday…..cliché, but true. i am a total night-owl and in a perfect world, i’d get my best sleep between 5am and 10am. My children do not know about this perfect world thing. They wake me around 6. : ) i love painting super HUGE or itty-bitty. i am a fan of extremes. i love eating with chopsticks. i love blankets. Celery gives me the heebie-jeebies. i cannot handle the sight, taste, texture or smell of it. As i write all this i realize….man, i am a big weirdo! Luckily, i really like weirdos. (oh….and as you may have noticed, i never type the proper “I” capitalized. i am sure it is annoying to some people. But i’ve been doing it as long as i can remember. A psychologist would have a field day with me : ))


MY ART: Hopefully you are all familiar with my art and it is what made you sign up for this series. Suffice it to say; I LOVE COLOR! i am always trying to balance the two visual styles i love most in the world; INTRICACY of PATTERN and FREE-SPIRITED ABSTRACTION. These two passions have morphed into a painting style that involves rather messy, free-spirited, colorful backgrounds overlaid with careful, intricate patterns and doodles. The combination of two never gets old for me. i do also love drawing kids/people. But that is a topic for a whole different workshop! Before i had my kids, i painted in either watercolors or oils. So different. Each had it’s purpose. But when i got pregnant with my first son, i tossed the oils to make life easier, less stinky, and more child-friendly. i didn’t want the fumes of the thinners and paint or the endlessly wet canvases that little fingers could get into. Making the switch to acrylic was rough for me. i missed the open time and blending you get with oils. But once i embraced the properties of acrylics and saw them as positives and not negatives, there was no turning back. It really changed my aesthetic and the look of my art. Now i am all watercolor and acrylic (any water-based media, really) all the time. i love how you can use them together and even borrow techniques across the mediums. I hope my love for the materials comes across in this series!! i am an art supply junkie! GETTING STARTED/ HOW TO BEST UTILIZE THIS WORKSHOP: Over the next 6 weeks, i’ll be posting lots of info, prompts and demos and step-by-step exercises. But this is a self-paced course at heart and you can follow along at any speed you like. Don’t feel pressured! This should be fun! This page on my site will just grow in length from start to finish of the course. Nothing gets deleted. It is a password-protected page. Please don’t share the password. Pretty please. : ) You will have unlimited access to all materials. Think of it like an art book – with video! Shelve it some days and pull it out others if you want. The info is here safe and sound, to access when you feel like it. The week headers will be BOLDED to help you navigate through. Downloadable cheat sheets, lists and other printable aids will be shown like THIS. to help you find those quickly as well. i have emailed you a Flickr Group link if you would like to upload your artwork to share throughout the class. i’d love to see it! i think the best way to discover your own path is to watch and read through all the posts, complete the prompts with basic materials and really play before you invest in every fun art supply in the book. Some things will grab you! Some things will not. That’s cool. Art is subjective. It has to be! i hope you will find this workshop to be fun, light-hearted, and stress-free. i’ve really tried to make it like a conversation…as though i was talking to you right here in my studio while we experiment and have lots of laughs. ps – if you watch crime shows and old sitcoms while you work, you will really be getting the full-on immersive stephanie experience- just sayin! ; ) Here we go!!

WEEK 1: WATERCOLOR
Watercolor is fast. Watercolor is portable. Watercolor is so crazy flexible and accessible for all ages. i can’t say enough great things. When i want to paint with my kids, it’s a no-brainer. They can share my pan sets or use their own (washable) ones. We can set up shop in seconds and paint inside or out. It’s play time. Can you tell i’m a fan? True confessions: Even though artists should theoretically be able to exist in a purist world of just primary colored paints that they expertly mix into every shade under the sun, i like having a ton of pre-mixed colors. What can i say? It inspires me to see a vibrant palette in front of me. It jogs my artist brain to infinite possibilities of color combinations and allows me to paint fast, moving from palette to paper in rapid fire style instead of pausing to mix so much. Painting fast really helps me in the “not overthinking it” department. i have a tendency to overthink. It’s what makes my doodles so crazy-intricate. It’s not an entirely bad thing, but when i focus too much on mixing i tend to lose the spontaneity of my “loose backgrounds.” Sooooo…..especially for laying down backgrounds, i sure do love sets of pan watercolors that have lots of pre-mixed color options. I have been known to buy a pan of colors just bc there is one single shade that looks enticing to me. i admit it : ) The shame!! So, while it is a fun exercise to blend your own colors…and while i do lots of blending on the fly as i work and in my detailed layers of paint…i’m still going to sing the praises of hoarding pan sets with oddball colors.

PREPPING TO PAINT: a note about stretching your paper: i rarely stretch my watercolor paper. But people ask all the time about how to keep theirs from warping when they paint on it. Here’s a simple explanation for you and then you can decide for yourself.

Paper warps with wet media because it is made up of fibers that expand when they absorb water. If you watercolor on unstretched, dry paper using a fair amount of water, you’re going to get a section of swollen fibers where you’ve painted, adjacent to a section of dry area where you haven’t. This causes rippling, buckling and puckering of the paper. Stretching your paper before painting prevents this. Essentially, you expand the paper fibers of the entire sheet by soaking it. Then you tape or tack the page down to a board to restrict shrinkage as it dries. Later, when you paint, your watercolor won’t do much more to expand the paper’s fibers, because they’ve already been pushed to their limit and held there. There are a jillion you tube demos out there that show you the simple process if you want to watch. Aside from art class in college, i’ve only stretched my paper a few times. Twice for large paintings that i knew would be getting a very wet technique, sure to buckle the surface. And also a couple times when i’ve painted delicate portraits where a “bumpy/buckly face” would not be a good look. i choose my battles ; )

For me, watercolor is more my “quick fix” choice of media. With 3 little kids, “Ain’t nobody got time for that” stretching bit, at least not on a frequent basis. If i had to stretch every time, i’d never get to paint! By buying the thickest sheet watercolor blocks i can…. at least 300gsm paper weight, i avoid most warping. The blocks are tablets of paper with gum sealer on all the edges. If you leave your painting attached as it dries, you barely get a wrinkle. Avoiding super saturation of the paper helps too. Not gonna lie, nice heavy paper is pricey. i always use coupons and promo codes to save a bit, then just close my eyes when i make payment and think happy watercolory thoughts : ) i use my fanciest paper sparingly, for client work predominantly. The rest of the time, i paint on cheaper/thinner/loose watercolor paper and just embrace a little buckling! i have also been known to spritz the back of a warped painting and then run a warm iron over it, or compress it under heavy books overnight to alleviate super-distracting ripples. i doubt i’d get approving nods from premier watercolorists for that, but it’s the truth! Mostly though, i love the extra bit of texture and crinkles. i really do! i think it is so charming and sweet looking.

i use cold press paper 95% of the time. The texture is so beautiful to me with paint on it. Check out how i set up my workspace to paint with watercolor in the video below. CLICK THE IMAGE TO VIEW THE VIDEO. Use password: painteveryday

SET UP SPACE: i do very little to prep for painting with watercolor. My paints are always out. When i sit down to paint, i grab a plastic quart bucket (from home depot) full of water, a mason jar full of water, a folded wad of paper towel, and a few surfaces of paper or block so i can simultaneously work on a few pieces. While one layer is drying on my first painting, i move to the 2nd, etc. i will usually pluck my favorite paintbrushes out of their jars and lay them beside me. The 2 water receptacles are for wetting vs rinsing. i use the bucket for cleaning/rinsing my brush when i completely switch colors or brushes. The mason jar is my dipping/wetting cup. It lives right next to the paint and sits on my paper towel blotter. The weight keeps the towel in place, and the towel catches drips. i work my backgrounds fairly wet, but when i get to details, i use much less water in order to keep them from bleeding, so they are more crisp. i blot a LOT on my paper towels. i hold an extra paper towel in my other hand to blot the painting if i wind up with an extra puddly area. i mix colors on any plastic surface with a lip…mixing trays or the lid of the pan set are both fine, usually. i squeeze a little blob of white gouache into the corner of one of my trays to give myself a nice opaque white option for adding details and doodles. i have dyes, gel pens, pencils and watercolor pencils nearby, and also acetone/rubbing alcohol and salt for random effects if i’m in the mood ; ) i highly suggest a closed-top beverage when painting. i have dunked my brush into more cups of coffee, tea or water than i can count over the years! Always a bummer. Although, i discovered that accidental coffee painting give s a lovely sepia tone! Now here is a fun video of all this talk in action! Pop it open in full screen mode to get the best view of details. This video shows a super speedy rendition of my typical process for making a fun watercolor abstract full of vibrance and texture. CLICK THE IMAGE TO VIEW THE VIDEO. Use password: painteveryday

In the video, you can see that i start out very loose and use plenty of water to let the paint go where it will and create unpredictable patterns and blends. i often start several backgrounds at once and then walk away while they dry. i’ll start dinner, play with the kids, or work on the computer. Coming back is the best part because it’s always a surprise! You never know exactly how the paint will dry. Each background will sort of speak to me and tell me which direction to go. Some might have beautiful blended areas that beg to be highlighted. Some might have interesting negative spaces to fill with doodles. i guarantee that you’ll be inspired when you “come back” to your backgrounds if you work this way. That first layer is really the only one where i use a fair amount of water. Subsequent layers use less and less water as i work toward the final piece. Even though i’ve sequenced this video to run each painting segment one right after the other, there is actually a bit of drying time between layers. This painting was actually 4 sessions of work. Hopefully, my Speedy Gonzales video looked like fun to you! In the painting step-by-step below, i break down my process (with a very similar painting to the SPEEDY one above) more slowly in photos + narrated video, so you can follow along and really see what i’m doing.
WATERCOLOR STEP-BY-STEP
i show the ENTIRE painting process without any edits in the following videos, so fair warning that they are a little long. But you can watch at your leisure, step-by-step, instead of all in one sitting if you like. i really wanted to explain everything i was doing for you all! CLICK EACH PHOTO TO VIEW THE VIDEOS. Use password: painteveryday

1 -i wet the paper a bit and add blobs of colors. i don’t overlap anything with the brush, but allow blending to happen where it may. A few drops of clean water over adjacent colors encourages mingling

2 -The negative spaces between the blobs are inspiring me to create connection between the blobs, so i use my thin, long bristled liner brush to create lots of lines and curves. i drip additional paint over the ends of the lines and blend a little to obscure the hard edges.

3 -Now i go for tonal texture. i’ll choose analagous colors (ones next to each other on the color wheel) to overlay some pattern in a subtle way, tone on tone. This builds up interest, highlights the transparent quality of the watercolor that i love so much, and builds up some bold, saturated color too. Here is a little color wheel i painted that you can use for reference! Analogous colors are ones adjacent to each other on the wheel. i would also use colors a step or 2 away from each other on the wheel when building up my tonal textures and layering. Really, any color that does not contrast too much will fit with my master plan (insert evil laugh). i definitely don’t actually reference a wheel each time, i just go with my gut. But it’s helpful to see…and aren’t color wheels so pretty? This was really fun to paint. You should make one too! : ) Or just screenshot and print this one!

Ok, back to bid-ness….. – At this point, i’ll usually sit back and squint my eyes a bit. If i blur the composition a bit with squinty eyes, it’s easier to look for balance. (My 3 year old thinks this is a laugh riot and copies me when he paints. HI-LA-RI-OUS!) i ask myself, “Does the left look too heavy and saturated? Is there enough tonal variation on the right?” This is all subjective assessment, of course. Some folks love asymmetry. Some need balance. Both are good! You may want to go for soothing, harmonious color, or maybe you want contrast and pop. i have a general desire to keep the viewer engaged and exploring the painting. So i work to visually connect parts of the painting to each other. if i notice a bit of turquoise pattern on one side, i’ll move to the other side and paint a compatible little area of a similar pattern….maybe on a difference scale. The viewer’s eye will naturally travel from section to section this way. It’s like a conversation. Maybe i’ll add some horizontal texture up top and then balance that with some vertical texture elsewhere. i’ll add some elements like flowers, feathers, swirls, chevrons. i always sit back and give the painting a once over every few minutes to be sure i like the piece as a whole. i use my white gouache for some contrast and bright spots, plus a little texture to pull the whole composition together.These detail and linework additions set me up for the next phase.

4 – This is my “coloring book” phase. i identify and “color in” many of the little nooks and crannies that result from my linework. i don’t go for perfection. In fact, i move quickly and blob the fill-in colors onto the page and let them dry how they may. This makes for some charming overlaps and color blends that are so characteristic of watercolor.

-walk away – Come back and view the painting upright from about 2-3 feet away. (Be amazed at how clearly any last necessary touches will come to you.) Add that last twig on the right, or splash of yellow on the left. Add little doodles or details with gel pen, ink, or pencil to push your painting to the next level. (i added some pencil sketches and some handwriting-type scrawls to coordinate with what i came up with for a name to the piece.) YES! Name your painting. i recommend the first zany thing that pops into your head. This is always how i name my paintings….whatever name it first calls to mind. It’s a lot of fun and sometimes embarrassing! But i’m committed to it. Anytime you see one of my paintings, know that the title was whatever popped into my mind the first time i looked at the finished piece. Here’s what mine looks like with final touches! i named it “The Narrator,” because when i look at it, all i can think of is how i described every section of this one in detail.

WEEK 1
Every day this week, it would be great for you to work on layered paintings. Use the method that i’ve shown you as a guide, but feel free to wander off on your own path as well. The more you do, the more you will fall into a rhythm and the ideas you like will repeat, while the ideas you don’t like so much will fall away. There are a million ways to paint and express yourself. i feel like sharing my specific technique is simply a way to get your creativity flowing. Maybe you will prefer to start with doodles on white page, then add big chunks of watercolor splotches on top. Maybe you will want to paint all the way off the edge of your paper. Maybe you will want to do zero background color, ink-drawn shapes each filled with watercolor patterns….i don’t know! But if you feel inspired to do it, there is no wrong way. It’s been said way too many times to count. But making art everyday is the best way to hone your craft and find your voice. Each weekday, i’ll post some fun info, prompts for experimentation or inspiration. Work the info and exercises into your art to push yourself a little further each day. The looser you are, the better the art will be.
WEEK 1 – MONDAY EXERCISE
Ok, you’ve seen hyperspeed video demo, and a step-by-step series of my process. Are you ready to dig in with your first exercise? Part #1 – Create 2 backgrounds simultaneously. You can work at any size you like. But i’d recommend working small this first time out so that you won’t be overwhelmed by huge, white pages. Maybe do one that is multicolor and one that is more monochromatic? Maybe one warm and one cool? Or maybe 2 that are similar color schemes, but painted with different layout so you can create a coordinate set. You are the boss! Part #2 – Complete one of your paintings by following the step-by-step method you saw in the videos. i don’t mean you have to copy my colors, shapes and forms. Just work in stages as the videos suggest…background field first, then maybe find a way to develop some structure, then add decorative linework and elements (any kind you like!). Give the “coloring book” method a try, overlay some pen or pencil. Be YOU! DO it your way, with colors and motifs you like. Part #3 – Use the remaining background to create a painting completely on your own without referencing my demo or step-by-step at all. See what comes to you naturally, now that you’ve absorbed the lesson and experimented using the step-by-step. If you are feeling a bit of creative block at any point, i’ve got a few cute things to share to help you along.
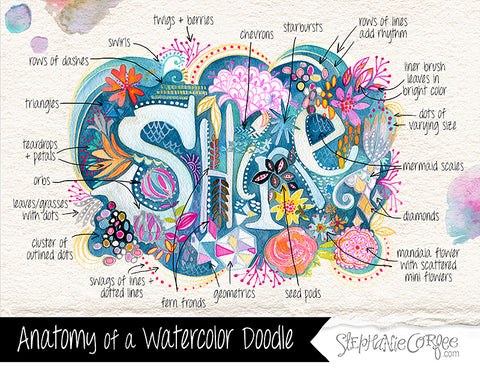
For times when you hit a wall and the ideas aren’t flowing, i’ve created a this little graphic called “Anatomy of a Watercolor Doodle," where i’ve diagrammed all the little details and motifs in one of my layered watercolors. You might draw inspiration from a section or two of this. i’ve also made a little Quick Reference sheet of fun color palettes you can try (shown just below) when beginning your paintings. Remember, these are not to be used as rigid rules, there are just beginner’s guides and inspirational prompts to get you going. Refer back to them when you need a little push.

You will hate me and love me for this. So, sorry & you’re welcome! A jingle was born one day when painting with my little boys, so pardon the lack of sophistication. i thought it would be a sweet touch to include it here, especially since i know i have some kiddos enrolled in the workshop. My oldest son kept asking what details he could add to his watercolor this particular day. My answer, that he could do anything he wanted, wasn’t going over too well. So i told him that some of my go-to shapes and motifs were “Blobs, lines, dots, flowers and loops.” He kept asking me for the list again and again til it morphed into a little sing-song….or maybe it’s closer to a rap? Either way, now it’s permanently burned into our brains! Of course, this is pretty rudimentary, and there are many more motifs you could add.But it’s start if you’re stumped! OK! So all roadblocks are down, and by now, you should have 2 stellar new paintings completed. Sit back and admire your work. Compare the two. Which do you like better? Which was more fun? Do you feel confident to keep trying more? Even better, do you feel inspired with fresh ideas you’d like to explore next? i hope so! Because i’ve got another exercise for you tomorrow! Til then! Hope you are off to a super fun start! xo,s
WEEK 1 – TUESDAY TECHNIQUES – PLAYING IN THE PUDDLES

Water Walls – Surface tension of water + sizing in watercolor paper combine to cool effect. If you wet the paper in a certain shape and then drop color into the wet area, it will stop at the edge of the area that is wet. It’s like a water wall. You can have tons of fun painting silhouette shapes, random shapes, splashes, or even letters with just clear or lightly tinted water (so you can see better what you are doing). Then drop blobs of watercolor into those wet areas and watch them combine and swirl and bleed into one another. Once you start, you won’t be able to stop. Smoothing Out the Edges Remember learning about osmosis in school? It’s like that. If you have a concentrated area of wet paint you want to feather out, you can apply some clean water to it’s edge and watch as the highly concentrated area bleeds softly into the less concentrated area Blow It Up! Puddles of watercolor can turn into expressive explosions when you blow on them. Use a straw to get a precise directionality, or just blow on a big saturated puddle birthday candle style/with force, if you’re in the mood for some unpredictable effects. Gravity is Your Friend Tilt and tip your paper to let gravity pull one color into another and create soft blends. Be careful that you do this intermittently and gently. It works better if not ALL your colors are drippy wet at the same time. Then they will just all end up looking like mud. But if a wet puddle of yellow bleeds into a damp area of red, you’ll maintain the yellow, a bit of the red, and a lovely orange in between.

Click the video to watch. Password: painteveryday
Experiment with these techniques today. Surround yourself with little trading card sized pieces of watercolor paper and go to town. When you’re done, choose your favorite results and frame them together as a group. Pretty!
WEEK 1 – WEDNESDAY PLAY – SKETCH ENHANCEMENTS

Remember lying in the grass and playing the clouds game as a child? The idea is to see shapes and forms in the clouds. You can do the same with your watercolor puddles! i sketch and layer linework on top of my paintings a lot. It is such a nice juxtaposition of my divergent styles….intricate, meticulous doodles/decorative drawing, fused with messy, amorphous, colorful abstracts. i let loose with color first, then hunker down and transform the painted shapes into something full of details. You’d be surprised just how much one step benefits the other. Today, try making a handful of interesting paint puddles. Drop watercolor onto a dampened page so it can spread out into shapes on its own. Then switch sheets and make blobs of color on a dry page, but maybe add a second color into each wet area to create blends. Use different size brushes. Go to town. Make some blotches spiky by blowing on the edges of the wet paint. Tip the page and allow drips. Just get a good assortment of shapes and colors going. There is no wrong way. When everything is dry, add sketches with pencils, pens, markers or whatever to create silly animals, monsters, hairdos, or anything else that feels inspired out of your blobs. Here are some examples to help you feel inspired. Use my examples above and below for inspiration.


WEEK 1 – THURSDAY – ART SUPPLY EXTRAS
Here are some fun supplies that you may want to consider adding to your watercolor stash.

Click above t0 watch the video demo – password: painteveryday
Resists + Water Soluble Writing Tools (Pastels, crayons, watercolor pencils) Resists/Masking Fluids block the porous nature of paper and prevent watercolor from being absorbed. The color will run around it. Don’t use a nice paintbrush for applying it. It will be virtually impossible to rinse off! Gently peel/rub it off the paper once the paint is dry to reveal a perfect white design. Clear wax crayons (you know the ones that come in easter egg dyeing kits?) or a plain old white crayon can work in a pinch for similar effect. Who is the genius who invented watercolor pencils? If you are a beginning painter or someone who really likes to work dry, this is the best of both worlds. i used to work in colored pencils almost exclusively in my 20s. i liked the control. But you always were left with the toothy texture of pencil on the page. Sometimes that was great, but sometimes i wanted the smooth blending of watercolor. If using watercolor pencils, you can take a wet brush to your watercolor pencil drawing and blend away! Brilliant. i also like the effects i can get when i draw directly onto wet paper with a watercolor pencil…think; chalk on wet pavement. Such a cool effect. Water soluble pastels/crayons work the same way as the pencils but come in a waxier, crayon form.

Dyes are watery liquid pigments meant to be absorbed into fabrics/textiles. But they are also fun on paper! i really like how vivid and truly transparent the colors are. A similar effect is achieved with Liquid Watercolor. The Dr. Ph Martin brand pictured above come in a set that will maybe last you the rest of your life! HA! They are so concentrated, you just need a teeny squeeze from the adorable dropper-style cap. So fun. Gouache is like a hybrid of acrylic and watercolor. It is velvety and matte like watercolor, but opaque like acrylic. Gouache is a great companion to my watercolors in my style of working with abstracts and pattern. It allows me to add lights on top of darks since they are opaque… totally opposite to the traditional watercolor method of leaving the “light” areas untouched from the start. If you have any of these supplies, break them out today and experiment. If you don’t, that’s ok too. Take some time to just paint from your imagination or revisit an earlier lesson you liked. i personally think you should only buy supplies if they light you up and inspire your creativity. Showing examples of how i use different supplies will hopefully give you a good basis of discovery and practical information to know if you should give them a go. Remember, i’ve got all sorts of product links in my post about my favorite art supplies! : )
WEEK 1 – FRIDAY – IDEAS
SCAVENGER HUNT! Gather up the following items and bring them to your work areas. Plastic wrap, paper towel, coarse salt, old toothbrush, rubbing alcohol.

Click above t0 watch the video demo – password: painteveryday
Today i want you to create some layered watercolors based on everything you’ve tried and observed this week, but possibly make them extra interesting with these basic household supplies demonstrated in the video above. – When you make your background, sprinkle some coarse salt on the page before you walk away. When you come back to your dry page, the salt will have created little sparkles where it absorbs areas of paint. – Blot dense areas of pigment with crumpled plastic wrap to make cool textures – Rip little tidbit of paper towel, dip them in watercolor and place them on your page. Leave them until they are just damp and remove. Do it a second, and even third time, allowing the colors to overlap. – Fleck concentrated watercolor over your painting with an old toothbrush for dark, pigmented splotches. Or fleck rubbing alcohol over areas of intense color, which will repel the paint, then evaporate quickly. Opposite effects! Upload your favorite paintings or experiments from this week to the Flickr group and leave (positive only!) comments to encourage each other! Hope you’ve enjoyed week 1!
WEEK 2: ACRYLIC BASICS & BACKGROUNDS

Click above to watch the video demo – password: painteveryday
Over the past 7 years, i have really come to love working with acrylics. They have creamy, rich pigment, bold, opaque coverage and a fast drying time that i have actually learned to embrace and use to my advantage. Plus, they are mixable with water. This is just the greatest thing for me having switched over from oil painting. No more linseed oil, turpentine, fumes or mess. Just soap and water cleanup! i switched when i got pregnant with my first baby to make life easier, and boy did it! There are times i wish i could get a little more open time (time while the paint is still wet and blendable on the canvas), but there are mediums you can use to help you out when absolutely necessary. Overall, i’m really in love with all that acrylics can do. They are so completely flexible! The lessons on acrylics are going to spread out over a couple weeks so we can really dig in. i’ve slightly modified the weekly schedule described in the course listing to make it as logical as possible. The focus for week 2 is going to be creating BACKGROUNDS, and abstract finalized paintings that have no top layer of illustration or doodling beyond line work i might do with paint. So, no markers, no dyes, etc, Just paint and canvas….so relaxing to tell a story with brush strokes and color. The process and techniques of getting paint on canvas in interesting ways will be highlighted. Then next week, we’ll move on to ways we can embellish and add to these results. Sound good? Awesome.
Set Up Space Let me jump right in with a video tour of my workspace and how i have all my supplies set up for painting with acrylics. So much of what you can do is better shown than explained, so i’m ready to dive in!

Click above to watch the video demo – password: painteveryday
Fluid vs Heavy Body Acrylics i am a fluid acrylics girl. They are the consistency of heavy cream, maybe a bit heavier. But i like them because the go on nice and creamy and flat without a lot of pull on the canvas and without too much break in the stroke. i really enjoy making sweeping lines and doodles, so this is just perfect for me. i also really like a smooth canvas. Peaks and valleys and texture on the canvas surface are not really “me.” Added bonus for my style is that a flat painted canvas really lends itself to doodling on top with paint pens or a fine liner brush. You don’t have to jump over lumps and bumps like you would with more textural brush strokes getting in the way. Fluid acrylics also drip easier, flow like watercolor easier, make washes easier. All the techniques i love best come from this formulation.

Now, that said, heavy body acrylics have their positive attributes as well. Just because they aren’t my cup of tea, doesn’t mean you shouldn’t feel free to use them! These paints are more the consistency of toothpaste. They hold a peak more and they really highlight expressive brush strokes. When you paint with them, you add a little texture on the canvas with each brush stroke. Once dried and cured, they peaks you leave behind will have “shrunk” a bit, so if you want texture, go overboard a little with application so the bit of shrinkage will still leave you with a moderate amount of texture. Here’s a detail shot of a painting i did with my 3 year old son, Grey. Thicker paint can be a little “neater” for kids since it doesn’t drip or splash so much.

The main thing to keep in mind for me, is that acrylic can only be watered down so much (by about half 50/50 water to paint) before the binders in the paint start to break down….so if you want a very watery wash, best to start with a more fluid paint, so less water has to be added. You can also add flow improver and other additives that the paint companies make. i have a whole drawer full of them, but i just tend to work simply and rarely use them. Choose the right consistency of paint for your taste and avoid the complication i say! : )
Opaque vs Transparent Color This could be an entire lesson all by itself. But since this workshop is more about sharing how i work and not attempting to cover all there is to know about acrylics, i’ll try to be simple and brief. My style of painting utilizes opaque paints 85% of the time and transparent techniques or paints the other 15%. i say “techniques” or paints because you can buy acrylics that are transparent straight from the tube, or combine your opaque acrylics with water or glazing medium to create transparent washes or glazes. All you really need to know for this workshop is that the options exist. It’s your mission to experiment and discover whether you prefer one over the other or a combination of both. Read the tube when you buy your paint. Look at the swatches on the display. It’s easy to choose what you want, if you know what you are looking for. i made a quick little demo of what transparent vs opaque applications can look like for you here. Food for thought : )

Click above to watch the video demo – password: painteveryday
For me, i like to create my acrylic paintings with juicy, opaque, saturated paint colors almost through to completion most of the time. In the last layer or 2, i will sometimes add a glaze to darken or intensify or give a tint to a certain area. Or i might allow some transparent drips or puddles to happen. If i’m feeling like painting in transparent layers on a given day, i’ll tend to reach for watercolors, honestly. It’s just a preference. i use acrylics for my bold work and watercolors for my more tonal, transparent pieces.
Using White i use a lot of white paint. i buy it in bulk. My favorite is Golden Fluid Acrylic Titanium White in the large bottle. i keep a smaller bottle of zinc white around too. It’s a transparent mixing white that allows you to lighten your paint without making it opaque like the titanium white would. But we will talk more about that below. White is my friend. Dots of white add contrast and energy to my paintings. White is a great tool for creating tonal backgrounds. i keep a puddle of white on my palette at all times and dip just the tip of my brush into it anytime i want to “shift up a gear” lightness-wise in the midst of painting. i don’t rinse my brush when i do this. If i’ve got red on the brush and have laid in a section, then want to add depth and tonal interest and texture, i’ll just ramp up bit by bit adding more and more white to my already red-loaded brush…blending right on the canvas. The result is so expressive and so much more interesting than flat color. Here’s a quick demo to show you what i mean. It’s a background (yes, the same one from the above transparency demo!) that i created in about 3 minutes without ever changing (and barely rinsing) my brush. i just alternately dip my brush into red, my whites, plus a touch of yellow and pink. See how quick and easy it can be to get some quick tonal texture as a base/background for your painting?

Click above to watch the video demo – password: painteveryday
i will blend ON the palette with white too. Mixing my perfect tints using white is like magic to me. It never gets old. Whenever my son sees me mixing colors, he’ll ask what color i’m making. i’ll often respond that it’s a color nobody has ever made before…..at least, not in that exact, specific ratio. It’s pretty cool. i mean, it’ll be a pink….but not quite a baby pink, or a bubblegum pink…..it’s a unique pink, right in that moment. So awesome! i do keep a heavier body white paint in a jar on my cart as well. i paint the sides of my canvases with it. It’s the last step of any painting. A clean, stark, white edge makes all the color on the surface POP that much more. The jar is convenient because i can dip my wider, edge-painting brush right in so i don’t have any wasted/un-used paint left on my palette when i’m done. The thicker consistency doesn’t run or drip. Perfect.

Working Wet vs Working Dry for Backgrounds Acrylics dry very quickly. Thicker applications stay wet and workable a bit longer than thin applications. Because i predominantly use fluid acrylic, i get only a matter of minutes before color i lay down is fairly fixed on the canvas. There are great way to utilize or work-around this fact. The intro “music video” to this section showed a fairly dry, chunky painting method. Full strength paint meets canvas. Nothing much to say there. But if i want a washier, blended background, i go about it a bit differently. i use fluffier brushes that hold more paint and water in their bristles, a damp canvas from the start, and super-quick color-grabs that i blend right there on the canvas rather than on the palette. Take a look at the difference in texture and transparency it gives.

Click above to watch the video demo – password: painteveryday
This method works pretty well and gives the added bonus of forced spontaneity. You can’t slow down to think when you are racing the clock. It’s a lot of fun. You can’t make a mistake. Anything you don’t like is easily covered in subsequent layers. So don’t worry!
WEEK 2 – MONDAY EXERCISES & PRACTICE – SIMPLE BACKGROUNDS
Monday’s exercise is to practice simple backgrounds. Use the videos above as guides. And then also view a quick demo video i made for you that shows my favorite paintbrushes and the types of strokes you can make with them. You can download a printable of the Brush Stroke Sampler too, if you wish :
)

Click above to watch the video demo – password: painteveryday
i have an addiction to mop-style (fluffy) brushes for backgrounds and flat (filbert and square bristled) brushes for details. There are so many brushes out there to choose from, but i always come back to these basics. Here is a little chart i painted of what each brush i love is great for. Screenshot the image if you'd like to save.

OK!! That’s all for today everyone! i will be posting minis the rest of this week, just like last week. Have fun!
WEEK 2 – TUESDAY TECHNIQUE – PAINTING A THEME
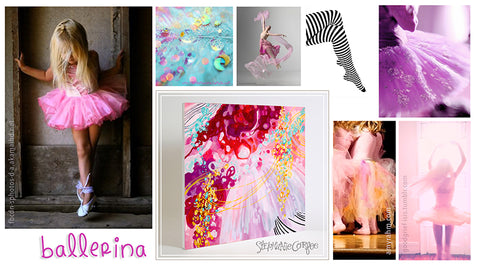
Today i thought i’d share a bit of my thought process that goes into the planning of a painting. That can be half the battle, right? Truthfully, sometimes i just let a color story develop on canvas…which is great. Color is awesome and all. But it isn’t enough to inspire me every time. Sometimes i need more. SO, because i just LOVE a good back-story, or a creative interpretation of an idea executed in paint. i will very often choose a theme for a painting before i get down to work. i’ll put myself in a daydream of sorts, really see a vision in my mind before i begin. It can really help to make a mood board too. A mood board is just a collection of images gathered together in one place that evokes a certain theme – or mood. You make one on Pinterest. You can sketch one out on paper. Or you can just imagine your theme in your mind’s eye, whatever works for you. My examples below are “finished” paintings….but that is really relative. They could just as easily be backgrounds if i decided to continue adding layers, right? ; ) The point is, they are abstracted compositions full of color and inspired by a theme. You get the idea : ) When i chose “Ballerina” as a theme for a painting. i didn’t paint a ballerina literally, but rather painted a “dreamy representation” that evokes ballerinas….with frothy pink tutu strokes, and twirling lines. i added black and white stripes, since i love stripey tights on my little girl characters when i draw them. Super fun : ) Here is a mood board for my theme. and the finished canvas, titled Ballerina.
Another mood board i’ve made was inspiration for a mermaid themed girls’ room. i put myself in mind of a mermaid in a secret cavern hidden by a waterfall and garlands of flowers hanging in the mist. i imagined bright colors in a downward streaking cascade. i imagined the view from inside the cave, and painted in a rounded border. Gold sequins recall mermaid scales and inspired metallic gold paint in my composition. Lots of coral color too… Here is the mood board and final painting titled Mermaid’s Waterfall.

So here is today’s challenge; choose a THEME and try to loosely, poetically capture it in an abstract way. Use only expressive brush strokes, composition, and color to communicate your theme. Make a mood board for inspiration if you like. i cannot wait to see what you all come up with!
WEEK 2 – WEDNESDAY PLAY – FUN, LOOSE BACKGROUND PAINTING
i want to tell you all something today; i make ugly paintings sometimes.Sometimes it feels like i’ll never make a pretty one ever again. Sometimes i make paintings that can only be saved by painting over them and starting fresh. Other times, i push through the ugly duckling stage and beautiful swan of a painting emerges. It’s all part of the process. Just like anything else, you will have your good days where you are in the zone, and your bad days when every decision and brush stroke is a stinkfest. Try not to beat yourself up. Laugh at the bad art!! Laugh at it so, so hard and then make a game of trying to save it. It has to be fun…otherwise, what is the point? For today’s assigment, i want you to let loose, be silly, have fun, empty your mind and just go with the flow. Create a background painting by chunking down blobs of color onto the canvas in a random way, the turn the canvas and add some more. Keep turning the canvas intermittently to keep you perspective fresh. As you paint, gradually finesse those chunks of messy color into something beautiful….not to ME or anyone else…but beautiful to YOU. Here’s a quick video to rev you up, followed by some of my own in-progress work to inspire you.

Click above to watch the video demo – password: painteveryday


Have Fun!!!!
WEEK 2 – THURSDAY – ART SUPPLY EXTRAS

Irridescents/Metallics, Neons & Acrylic Paint Markers It’s fun to add some fancy goodies to your paint arsenal from time to time. My favorites (that still qualify as paint) are irridescent/metallic paints, fluorescent/neon paints and acrylic paint markers. i LOVE adding touches of metallic gold – it is just so magical. Irridescent paint ads that Mother of Pearl, fairy dust-type sheen. i use them straight, or mixed with other colors. Fluorescent paints are my addiction. The pink has got to be the happiest color on earth. i find that the Liquitex pink is the best of the fluorescents. It changes the colors you blend it with so they look a a touch fluorescent themselves. The orange/red loses its glow a bit when mixed. The yellow is awesome, but a bit transparent. When i want true, neon-y yellow, i typically mix it with a bit of white for opacity, then let it dry and hit it again with straight fluorescent yellow on top to intensify the color. Liquitex and Montana paint markers are both great. i will take the nib out and rinse it between uses so that acrylic paint can’t dry in the fibers. That’s always the bugger with paint pens. After the first use, the nib gets dry and solid with paint and then it’s useless. So don’t forget this part!! Just remember to get all the drippy water out of the nib with a clean towel before you place it back in the marker. i’m not sure the companies recommend this, but i’ve had great success with this method. i do all my doodles with acrylic paint markers. i really like that they have the same finish when dry as the painted surface. Oil based paint pens can quite shiny. They still work. It’s just a personal preference. So try out some of these fun extras if you get the urge. Can you tell i never met an art supply i didn’t want to try?
WEEK 2 – FRIDAY – IDEAS + Q&A
In addition to the Q+A today, i wanted to talk a little more about the creative process and days when you are feeling lost for inspiration. On Tuesday, i talked about painting a theme. And in the main post, i showed how i used a fashion image to inspire a color scheme. It feels cliché to say it out loud, but inspiration really is everywhere. If you are feeling like the blank, white canvas is giving you artist’s block, here are some things you can do to snap out of it. – Flip through fashion or decor magazines. Don’t focus too hard. Just flip through and stop at things that grab your attention. There will be a reason they stopped you in your tracks. If you are compelled to stop at an image, tear it out or snap a photo with your phone. i keep a folder on my computer labeled “Inspiration.” It is full of gorgeous things like photos of flowers, cake frosting, fashion, earrings, shoes, embroidery…whatever! Later on, you can go back and dissect each image into colors, patterns and compositions. Then use that info to inspire your art. – A change of scenery is great for me too, since i spend so much of every day in my home office/studio. Get out in the world and get a fresh perspective. Notice patterns and shapes in nature, architecture. – Hit pinterest to see what colors are trending on the home page. do any of them inspire you or challenge you? – Look back through old sketch books and revive your old ideas. i have every sketchbook i’ve ever owned. We are talking back to high school. Its trippy. – Go grab a coffee and hit Target, or a thrift store, or a toy store or a card store. Check out the retail displays and the colors and patterns in the clothing section. Does anything jump out and give you a lightbulb moment? ….and if none of those works, take a shower. My best ideas always come to me in the shower : ) And now i leave you with the Q+A and wishes for a great weekend!!
**note: i recorded Q&As during the very first session so that i didn’t forget anything! Subsesquent sessions won’t have Q&A recordings, but if you are struggling with anything, please feel free to write me : ))

Click above to watch the video demo – password: painteveryday
WEEK 3: LAYERING EVERY WHICH WAY – THE MID-LAYERS

Click above to watch the inspiration video – password: painteveryday
This workshop is called LAYERS OF COLOR. Last week was focused on the background and basics of getting some paint onto the canvas. This week, i will focus on step 2. It’s all about where to go next once you’ve got your basic, unrefined background composition in front of you. You’ve established a color story. You’ve got a basic composition going. You might have a theme in mind, a mood, a back-story. Time to start refining it.
How Your Background Can Inform Your Middle Layers When i create my background paintings, i try to visualize the finished art as i work. You need your artist goggles on for this. Sometimes the background of a painting can be vastly different from what the finished piece will look like, and sometimes it’s pretty close. In the example below, i made a mid-tone teal and gold softly patterned first layer with full intention of covering most of it up with navy blue. But see the way that background now creates pattern in the leaves? Are your creative wheels turning?

The example above is unique. But usually, i lean toward one of my go-to styles of artwork that have emerged over the years. One of those styles involves a heavily detailed top layer of line work and decorative illustration. I will draw in either black or white paint pen right on top of my canvas background. Keeping the tonal value of my backgrounds fairly even across colors is important if I want the line work to pop and make an impact. There can’t be too high a contrast between lights and darks, or some of the linework will be obscured. If I am going to be working with white paint pen, I will keep my color values fairly dark in the background, not too much white blended into the colors. It doesn’t need to be complicated or technical. Just imagine how well white lines will show up on any of the paint colors you lay down. If you start to veer too much toward the lighter shades, back off the white and darken things up a bit.

The opposite is true if I am going to be working with black paint pen for my top layer illustrations. The background needs to stay fairly light to mid-tone if I want my thin black lines to be visible.

A third possibility is adding linework that i know i am going to fill in with color. In that case, the “rules” sort of go out the window and i just paint whatever colors and tones i feel like. Yes, sometimes that is the theme of the day, anything goes! In these cases, it doesn’t really matter to me if the linework pops. It’s just a framework for color. Here’s an example:

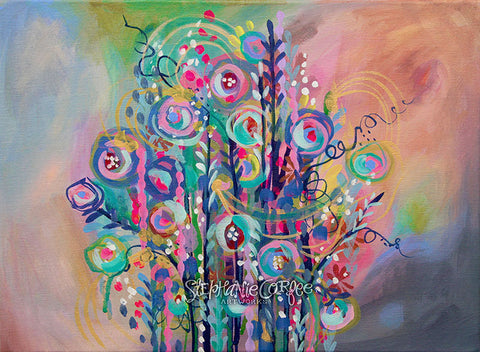
See how the background has lights, midtones and darks? It doesn’t matter because the doodles are colored in in a way to make them pop, the linework doesn’t need to contrast so much. I don’t always add an illustrated or doodled layer to my paintings. Sometimes I opt to add layers of painted color and detail with smaller and smaller brushes as I go. It’s a broad-strokes-to-small-strokes progression for the most part. Larger, broad, blended strokes in the background working forward to smaller details and patterns. It’s a bit similar to a photograph whose background is blurred in the distance and who main subject is crisp and focused int he foreground. When I paint in this style, I go for impact and contrast, or interesting color combinations. So it depends on my mood any given day. Here is an example of a painting that developed from large, broad, blended strokes to smaller, crisper patterned strokes. It was developed for a very specific product application (licensed gift product) and we knew we had to have a very uniform amount of movement in every area of the canvas for it to work. In this case, the background art established a color scheme. Then, those same colors were layered in such a way that they danced off of each other and developed more and more depth with each layer, even though the same palette was used throughout.

Manipulating the Paint – drips, streaks, clean dots, pulls, leaves, droplets, linework, chevrons, paper chains, scatters

Ok, I think this is the part you all will be most interested to see. How to apply the paint artfully to the canvas. Right? Again, I am happy to show you my methods, but feel free to explore and create your own. Get so used to holding and moving your brushes, that they begin to feel like natural extensions of your arm. It will take a long time if you are new to painting, so be patient with yourself. We have touched on these strokes back in the brushes sampler, but here, i’ll show actual use in a painting a bit better and talk about how and why or where i like to use these brush strokes most. Also, it’s good to note that the same strokes are used across all the layers, so we’ll repeat them a lot, but the placement and purpose gets tightened up layer by layer. We go from loose and random in the backgrounds, to more controlled and purposeful in the subsequent layers. Drips – drips make me happy. I try to depart from them and branch out…but I keep coming back for more! I think there is something great about the unpredictable nature of drips. It’s controlled chaos. There are 2 main ways I create my drips. 1) water down the color of paint you want to drip. Aim for the consistency of whole milk. Load your brush and make a puddle on the painting…or a line..or a streak. This is where your artistry comes in. Maybe you want drips from the top edge. Maybe you want drips emerging from a cloud shape or from a swooping brushstroke across the canvas. Express yourself. Don’t just follow a formula. Ok? ; ) anyway, back to your puddly paint sitting there on the canvas however you applied it. Now you can spritz the paint in a downward motion to encourage drips. Fun, right? 2) to be a bit more controlled, you can use your brush only. You basically follow the same procedure, but then you continually load the brush with water paint and push downward in areas where you want the drip to emerge. You can really place them precisely this way. 3) one last way you can get the effect of drip but be super controlled is to paint them on directly. Yes, it’s cheating! haha. but if you have a vision and don’t want to chance it, just use your brush to lay down a “path” of wet paint with your brush….then force a bit more paint, little by little, into that path. Watch the demo. i’ll show you what i mean.
Streaks, arches, curves, lines – 3 words: long, handled brush. You can make long, thin streaks with a short handled brush, for sure. But a long handled brush helps you cover a longer distance with the flick of your wrist rather than movement of your whole arm. This actually makes a big difference in the smoothness of the curves you can make. i find the small, fine motor skills in my fingers and wrist are easier to control in a precise way than the gross motors kills of my whole arm. i know, i know, that sounds very technical. Haha. Even if you are using a short handled brush, experiment. Try making a long arc when holding the brush at its center vs holding brush near the end. See the difference? Now, for the paint, you want a bit of a milky consistency to the paint for this technique same as for drips, because it keeps the paint from pulling and dragging across the texture of the canvas and leaving gaps in the stroke. Mix your paint with water to get the consistency of heavy cream; thick enough to stay on the brush, but thin enough to flow across the canvas. i like to develop rhythm using lines. Five arching lines in a row….9 short lines stacked neatly. It’s a soothing pattern and draws your eye to a certain area of the canvas. i also use streaks to add texture and structure to my paintings, or to visually connect one element to another. i love the randomness in painting lines. i let them wobble and go wherever they want to wander. For me, getting some line structure onto the composition is often where i really feel a painting come to life and i see the composition so crystal clear.
Clean dots – this is totally a made up name! But I wanted to describe it accurately. I make a lot of these pounce-type dots that are more of an oval shape. It’s basically a filbert brush that I touch down on the canvas. If you have a fully loaded brush, you can touch once and sometimes, as the brush empties of paint, you need to touch once in one direction, then flip your brush and touch int he other to get all clean edges. (see demo) I use scatters of these dots a lot. They add movement and excitement. Sometimes i will keep them all going the same direction, sometimes i will rotate my brush as i go to create a bit more variety. Sometimes i will also change brush sizes to add interest or to taper and trail off. These dots give my work this impressionist sort of feel.

Pulls – Another made up name : ) i use these brush strokes when i want a softer look and some directionality to a painting. i demonstrated these last week on the brush stroke sampler, but here are a few more examples of what you can do with this brush stroke.
Leaves & Petals – i LOVE to draw & doodle line work leaves & petals because florals are really in my wheelhouse. But i also like to create solid ones with brush strokes. The gentle, curving, teardrop shape is so pretty and feminine. Essentially, you want to go from a broad area and draw the paint out to a point. Adding a little flick of the wrist like when you write a comma is the key. Use a filbert brush turned on its side. Load with paint, touch down to get the broad end of the leaf or petal and then make a bendy/comma curve as you pull the brush away from the canvas. It should leave you with a narrow point where the leaf/petal would be attached to the flower. Watch the demo and see what i mean. It just takes a little practice. If you combine this shape with some linework, you can create vines and stems. It’s a really versatile stroke.
Droplets – It’s just an upside down “pull ” stroke : ) Droplets are fun and whimsical. You can make big blobby ones, or teeny, delicate ones. They remind me of the sprinkle from a watering can and give the look of shimmer and sparkle on the canvas. It’s the same technique of heavier to lighter pressure as with leaves and petals, just without the curved shape. Here’s a video where i advance one of the background paintings from last week by adding a mid-layer and narrating the strokes and placement as i go:

Click above to watch the video demo – password: painteveryday
Chevrons / Arrowheads – I like to make rows of things; dots, squares, lines, and these little “v” shapes that almost look like a heart. In a horizontal row, i call them chevrons. In a vertical line, i call them arrowheads. Not sure if either is very technically correct….but that’s what i call them in my head! The vertical rows are made v-by-v as i go down the canvas. The horizontal rows i make by doing all the left sides of the “v” shapes first, then i go back and add the right sides. (see demo) These add great texture and can break up areas of dense color or too much directionality that you might want to get rid of.

Paper Chains – i named a whole painting after this stroke shape! Imagine a cake decorator doing a shell piping around the edge of a cake. It is sort of like that. Use a loaded filbert brush on its side and alternate heavy and light pressure as you drag the brush along the canvas. It’s addicting. I call them paper chains because they remind me of party garland.

Donuts – You know the circle and oval shapes i often layer into my paintings? Yep. Donuts. i use them almost like little picture frames. If you encircle a beautiful little vignette of pattern with a donut, it’s like framing it and making it a focal point. You can encircle plain color too, just depends on your inspiration on a given day.
Scatters – This is when i just let loose and sprinkle a whole bunch of brush strokes in various directions all over the canvas. i don’t perfect the edges, there is no rhyme or reason. It’s like blowing a dandelion fuzz out into the air……little wispy strokes that land every which way on the surface of your art. Here’s another video where i advance a background from last week…and describing my thought process as i go.

Click above to watch the video demo – password: painteveryday
And that’s it for my favorite brush strokes and how i use them in the middle layers. Hopefully, you will make up lots of your own and give them wack-a-doo names like i did. Experiment, experiment!
Creating life Utilizing Contrast, Complementary Color, Hue, and Saturation CONTRAST – You can amp up mood and energy of your painting by using using high contrast strategically. If you use very light color and very dark color in the same painting, your range of values will be large and you will have contrast overall. Placing the lightest light and the darkest dark side-by-side in your painting will create DRAMA!

COMPLEMENTARY COLORS – Similarly, if you place 2 complementary colors (that are opposite each other on the color wheel) side by side, like red against green, or blue against orange, they will almost seem to vibrate against each other. SO much pop and life results! They will jump off the canvas.

HUE –Don’t just make a “purple” painting using color straight from one tube. Create depth and interest by packing a monochromatic painting full of many, many hues of the focal color. There will be so much more for the eye to feast on and the work will be so much more sophisticated and engaging. The middle layering is the time to blend subtle variations of the background colors and add them to the canvas.

SATURATION There are lots of ways to create a soothing piece of art.If you are going for sleepy, dreamy, meditative, and soothing paintings, my favorite way is to keep the overall saturation to a minimum. Go for gentle blends of color and slight transitions from one color area to the next. These paintings can often be best appreciated up close, where texture and subtle brush strokes and color shifts are more apparent. The subtleties of darker tones that recede, and lighter ones that come forward are so elegant. i mean, i am a person who loves bold color. But even i like the occasional muted color palette full of greyed out shades that are super unique.

A note on listening to your inner artist For the purposes of the workshop, it is really great for you to follow along and use my color palette sometimes and to practice my favorite brush strokes as well. It’s akin to singing a lot of karaoke before you begin to write your own songs. The confidence you are afforded by trying a tested method gives you the freedom to develop your skills, to get familiar with the supplies, to hone habits and get a feel for the whole painting thing. It’s great. It’s a good thing to do. But if you really want to be your own artist, you will leave it behind at some point and start trying your own thing. Maybe you love black and white paintings. Maybe you hate red and want to go through a blue period. Maybe you love simple, blended color paintings that are subtle and elegant. GREAT!! Put yourself out there and paint with your own aesthetic in mind. Paint what you would hang on YOUR wall. Make paintings that are unmistakably yours. It will take a while. i don’t think i am fully there yet and i’ve been doing it for a lot of years! haha! But the evolution is pretty fun, so i won’t complain. : )
WEEK 3 – MONDAY EXERCISE – BRUSH STROKE BOUQUET
i’m so excited about this exercise! You will be creating a soft, blended, wet into wet background. Then you will be utilizing all the different brush strokes to create an abstracted floral bouquet. Bonus points for using as many of the techniques and principles as you can! Follow along as i do the exercise in the video below and narrate as i go.

Click above to watch the video demo – password: painteveryday
WEEK 3 – TUESDAY TECHNIQUE – MASKING SHAPES

One fun way to layer your paintings is by creating little windows to the detail below, or masked shapes. i showed an example in my painting, Night Bloomers at the top of this week’s main post. For the Wednesday Play section this week, i thought it could be fun to show you how i go about making these masks. Essentially, you are turning your most interesting sections from one layer, into beautiful little Peek-a-Boos in the next. It can also be a handy way of covering little bits that you might not like, in an intentional and beautiful way. Here is a video demonstration.

Click above to watch the video demo – password: painteveryday
** a little extra something** i got an email today asking for a bit more info/direction to help with the Paper Chains style of brush work. So i did a little hand-held (sorry for the wobbly camera work!) video to get as close to the canvas as i could and zoom in on the varied pressure i was giving the brush to achieve the effect. Hopefully this is helpful to any others who might be having this same difficulty : )

Click above to watch the video demo – password: painteveryday
WEEK 3 – WEDNESDAY PLAY – PAINTING FLORALS
When i think of playing with paint, florals come to mind easily. i paint a lot of florals. So today’s PLAY session is going to be all about ways to paint a bunch of styles of blossoms, stems, & leaves, building bit by bit to achieve a balanced composition. You can make up whimsical flowers. You can be inspired by real ones. Use any color combo that suits and have fun with it!

The piece above was commissioned and the client had me incorporate some very, very special handmade flower beads with lots of meaning.

And here is one of my large-scale florals (36×36) shown in both mid and final stages on my easel. See how adding the smaller bits and extra layered shades of color finishes it off? To begin today’s painting, i masked off some leaves on a painting from last week. i chose a dark ground color because i love how the vibrant flowers just pop in contrast.

Then i filmed my play session so you can follow along and hopefully be inspired to have some fun of your own! Enjoy!

Click above to watch the video demo – password: painteveryday
WEEK 3 – THURSDAY – ART SUPPLY EXTRAS – ALTERNATIVES TO STRETCHED CANVAS

On Tuesday, you saw me use some canvas paper for the Paper Chains close-up demo. It’s a great supply to have on-hand if you will be practicing your acrylic painting a lot. The sheets have the same texture as a stretched canvas, but at a far less expensive price. The sheets are also easier to get onto your scanner of you want to capture digital images of your work. Lastly, if you want to be able to frame your acrylic paintings on your own, using canvas paper is pretty convenient. It pops into store-bought frames as easily as any photo.

Another option is to use canvas panels for your practice. i buy these for my kids a lot. They are like sturdy cardboard wrapped in canvas. So they stand upright nicely, but are very thin in profile. You can slide them behind a dresser or bookcase if you are low on storage space.

Another economical canvas option is to paint on un-stretched canvas. You can tape, tack or temporarily staple it to a board (or the wall) if you prefer painting upright, or paint flat on a table. You will have the flexibility to store your work flat or rolled when you’re done as well. Shipping un-stretched canvases rolled in a tube has the added benefit of being a cheaper way to send out paintings if necessary. Boxing or crating stretched canvases can cost some big moula. : ) And it always gives me butterflies in my stomach when i’m waiting for a stretched canvas to arrive at it’s new owner un-scathed! If you are extra awesome and patient, you can even prime/gesso your own canvas with some fine sanding of the surface between coats. i am too lazy (or rather – lacking in lots of extra time while these kiddos are so tiny!) to do that. But it is yet another way to support your painting habit on a budget. Do a little of each as suits the project or practice. Whatever it takes to KEEP PAINTING!!
WEEK 3 – FRIDAY – IDEA – COLLABORATION
My brilliant idea to share with you today (playing fast and loose with the word “brilliant” here) is COLLABORATION. Sometimes we get stuck in our own ruts and need to broaden our vision. Collaborating on an art piece is an excellent way to see creatively through someone else’s eyes. And a LAYERED painting is the perfect opportunity to share the process. You do a layer, then let a friend, your husband or one of your kiddos take a turn, going back and forth….you get the picture. This is surprisingly eye-opening. i kid you not. My art took such a turn for the better when i started collaborating and painting with my kids more and more. Even as recently as a few months ago, i started in expecting my then 2-year-old to make a muddy mess when we got out the brushes, and he really surprised me! i let him choose the paint colors to squeeze out and followed his lead a bit. This is what we made:

Kinda cute, right? Not at all what i expected.

..and you gotta love my happy collaborator, right? (yes, he has a shirt full of stickers and Spiderman is face-planted on the floor behind him – eccentric, temperamental kid artists!) If you follow me on Facebook, you’ve probably seen lots of the Kids Collaboration projects i’ve been doing via mail with kiddos from all over the country (and beyond!) These 4-step/ 4 layer paintings have been such a learning experience for me. They have pushed me to compositions and color schemes i would not have chosen on my own. It’s liberating. Here are 3 of the collabos in stages 1 & 2. The kids did the paintings on the left and then i took a turn on the right.

Next week, when we begin to tackle Doodled/Illustrated layers, i’ll show you stages 3 & 4 from these amazing kids. So in a nutshell, i encourage you to collaborate. If you don’t have a willing collaborator, maybe you could at least talk the party pooper into choosing your color scheme. If that doesn’t work, hit Pinterest (if you want to follow any of MY boards for inspiration, find me here) and close your eyes as you scroll, then open ’em! Whatever image you see first – use THAT as your color story and composition. See? There’s always a way ; ) It’s just about forcing yourself out of the box and expanding what you think you can do. Because you can do a lot. i promise.
WEEK 4 – DOODLING & ILLUSTRATION OVERLAYS

Click above to watch the video demo – password: painteveryday
We’re in the home stretch everyone! This week is all about adding doodled and illustrated elements on top of our colorful artwork from the past few weeks. i don’t always add illustration on top. Sometimes, i call it a day after my painted layers are complete. That’s fine too. But i also really enjoy adding doodles, flowers, lettering, faces, and characters on top of my colorful backgrounds. Sometimes the background is completely secondary. Meaning, i paint it for the sole purpose of creating a backdrop for an illustration i envision in my head from the start. This week, we will revisit watercolor a bit so that i can show you how i use ink, gel pen, and pencil to draw on top. And we will continue to move forward with acrylics, using paint pens to add line work. These are my go-to tools for each type of painting. Over the years, i have zeroed in on these particular tools for ease, consistent results and permanence. i love the look of pastels and graphite over acrylics on canvas, and will sometimes still go there…but those require fixative so they won’t smudge. And i’m all about easy and fail-safe these days with a baby and a curious 3 year old always visiting me in the studio! But by all means, feel free to explore with whatever materials interest you; pastels, crayons, colored pencils, markers…whatever! One thing that will be a bit new in this lesson, is the use of screen capture video. Doodling isn’t really something to teach “technique’wise.” It’s just pen to paper/canvas + lots of practice. You can’t doodle “wrong” after all. But what i can do is demonstrate how i go about it while you watch. i can also share lots of inspirational images, plus styles and shapes of doodle i love. Lastly, i can explain how i decide what compositions and tools will work best for different circumstances. Choosing Your Tools Watercolors – When drawing over watercolors, i consider absorbency of the paper and “mood” of the art. Watercolor is typically soft and blendy, so take that into account when choosing your drawing tool. Do you want to CONTRAST that softness with crisp, black ink and graphic doodles? Do you want to stay in a softer, more sketchy style and use pencil? Or maybe you want to capitalize on the pure simplicity of the watercolor and add whimsical touches in color with pencil or gel pen? Your choice before you begin will have a huge bearing on your final result, so think about it.

Here are my tools of choice for drawing on watercolor:

Black ink pens -Micron Pigma Ink Pens – nib sizes 001,01 and Brush are my favorites, but i have a full set. Also Pitt ARtist Pens – nib sizes XS, S and Brush.
Mechanical Pencils – i always use mechanical pencils for doodling or linework. i just get them from Staples. Any old kind will do. When i do pencil portraits, then i use a Derwent set of graphite pencils. i use the hardest lead (4H) for crisp details like eyelashes and fine hairs and the softest lead (6B) for dark areas of soft shading. i pick and choose for all the details in between.
Gel Pens – i have a a whole bin of random brands and i am not too picky. But i do really like the Soufflé Gel Pens by Sakura for a nice, opaque, pastel ink that is raised a touch so it seems almost like embossing. Here are some tips i can give you after much trial and error drawing over watercolor/gouache: 1)Nibs can gum up a little in areas where you’e got excessive pigment laid down. Keep a damp paper towel nearby and tap it periodically to keep the nib clean and clear. 2) Keep a scrap of paper under your hand as you draw when using pencil, so you don’t smudge graphite all over the surface 3) Use a nice fresh pen with plenty of ink so you can avoid pressing really hard to get ink to flow. Pressing too hard leaves indentation in nice paper. 4) Be sure to only use gel pen in your top-most layer. It will smear when if you watercolor over top of it. Black pigment ink, on the other hand, will stay put. 5) Make sure the paper is bone dry before you draw on top. The paper pulp is soft when wet and you can scrape it up with your pen or pencil easily. You could possibly get unwanted bleed from your pen if the paper is wet too. Just better to save drawing on top for the next day. Acrylics – When drawing on top of acrylics, i will occasionally use pastel (as mentioned above) or graphite, which is super cool. But most of the time, i do tend to stick with more permanent materials like acrylic paint and acrylic paint pens.

Sometimes i use a Sharpie marker with the kids. It’s cute, but not super professional quality, because the transparency of the ink gives it a bluish, purpley cast. And i’m guessing it’s not acid free either? : ) Sharpie paint pens are an option, but those are oil based. So if you use them, be mindful that a) they will have an ever so slightly raised dimension to them and b) they will be shinier when dry than the rest of your painting. These things are not necessarily negatives, they are just truths. So it’s nice to know. The oil based Sharpies take a little bit longer to dry, too. So be careful not to smudge! My favorite thing is an acrylic paint pen. Montana and Liquitex both make really nice ones. And then, there is always just straight Fluid Acrylic Paint and my trusty liner brush. The first painting below, “Bluesy,” is all done with a brush. The other painting, Watery Woodnymph, is paint pen.


Here are some tips i can give you after much trial and error using paint pen on acrylic/canvas: 1)Use a paint pen with a fresh nib that has been shaken well. A new paint pen is great, but i rinse the felt nibs in my pens after each use, then let dry and re-insert. Haven’t had any issue yet! When acrylic paint dries in the fibers of the felt nibs, it plugs everything up and you don’t get even, easy paint flow the next use 2) Drag the pen rather than pushing it. You’ll get less skipping and spitting when you hit a bit of texture or a bump on the canvas. 3) Work flat or with the canvas just slightly propped – mostly horizontal. If you try to draw with your canvas upright, the paint pen won’t be at a good angle for the paint to flow. i often take canvases to the couch with me and get to watch a show with the family for a change while i work ! 4) Work left to right if you’re a righty and opposite if you’re a lefty so you don’t drag your hand through wet paint. 5) Create large shapes first, with fresh eyes and a clear sense of the composition. You will get “detail-blindness” as you work and your focus will be micro more than macro. You lose the forest for the trees. 6) Keep a small junk canvas or sheet of canvas paper next to you for “reloading/pumping” the paint pen nib. Something with the same texture and slickness of the canvas will give you the most accurate sense of flow that you will have when you bounce back to the actual art.

Click above t0 watch the video demo – password: painteveryday
Feel the Fear and Do it Anyway Hopefully the little video above has you raring to go. Because, after laboring over a background and carefully layering on beautiful, painted details, sometimes there is just too much fear that you will wreck your work by drawing on top. It’s ok if certain paintings feel too beloved to draw on. I’ve been there. But if you’re determined to make some paintings with drawing on the top layer, you will have to conquer this fear. It helps to make lots of backgrounds. Be an assembly line. Make 3 backgrounds in one sitting and use smaller, cheaper canvases or papers. Then it won’t feel so precious to choose one to draw on. And don’t worry, after you’ve been doing it long enough, this fear absolutely goes away because you gain the confidence to know that you can always create more.
Choosing Your Subject Matter Whimsical Doodles – i love whimsical doodles. i lovingly refer to them as a napkin doodles. You just allow your mind to wander and sketch whatever comes to mind. A little cluster of stars can nestle happily into a heart which is floating on a bed of fluffy clouds, etc, etc. Anything goes. You can use spirals and loops and sparkles and dots to fill in the gaps. Very feminine and twirly.

Geometrics & Curves– Geometrics are all about angles and sharpness. For me, they help add a little edge to my otherwise, uber-feminine leanings. Think triangles, squares, cubes, diamonds. Straight lines and pointy corners help give a bit more masculinity and structure. Curves can be any arching, wandering lines. Neither of these types of marks need to be representative of anything. They are great decorative add-ons to other doodles, or can stand alone and look cool and graphic.

Click above to watch the video demo – password: painteveryday
Detailed Florals/Botanicals – When i think of proper florals and botanical drawings, i think of detail and accuracy, like an artist’s sketch from a botany textbook. There are detailed etchings of veins in each leaf and delicate fluttery edges to each petal. Sketching florals from life is one of the most relaxing things i can think of. There is repetition with each petal and leaf, but no 2 are exactly the same either. Nature is awesome.

Lettering/Quotes – Hand-lettering is such an art form unto itself. You can draw letters or a pretty quote right over your art as the main attraction. Think; doodled, stylized letters as the focal point. Or you can draw some doodles or decorations and tuck some special names or phrases into the nooks and crannies of the curves and lines.


Characters/Animals – What about the family dog, drawn in pencil over a colorful puddle of watercolor? Or an illustrated character drawn over a magical world you’ve painted in acrylic? Decorative painting for kids spaces springs to mind. And why have a boring, flat background to for your characters to sit on, when you can have so much more?

Sketched Portraits – Ah, my favorite. i love a simplistic pencil portrait drawn over or around a messy watercolor. That’s right up my alley. But if you wanted to make a line drawing portrait over an acrylic painting, you certainly could. You are only limited by your artistic vision.


i know this is a lot of imagery to mull over! It is meant to inspire you and show you the full scope of how i like to layer my drawings over paint. But for now, let’s just focus on doodling. You can experiment with these other ideas and more after you get comfortable with the whole process. Doodles are such a great intro. They are accessible to everyone and there is no experience needed to get started. Here is a fun printable to help you get started with your doodled drawing layer. It has lots of doodle examples for you to use as reference, as you sit at your desk or easel. (Just click the image to get your printable PDF)

Mapping Out Your Composition For me, mapping out my composition (physically or mentally) is especially important as i begin the drawing stage. i mean, you’ve spent so much time creating a beautiful painting and the last thing you want to do is let your illustrated layer take over with a life of its own, hiding all you have done. Doodles, in particular, have a way of growing out of control. haha! You get lost in the process, and before you know it, you’ve covered the page. What i typically do before i begin drawing is stand back a few feet and try to see the overall strengths and weaknesses of my painting. You will most certainly have a favorite section that you love and maybe a section or two that is not as strong. Plan to fill those lacking areas with your doodles and decorations. Nobody will ever know.

Here are a few things to have in mind as you plan and work:
Scale & Spacing – Think about adding a combination of large and small elements to keep the eye moving from one area to the next. Or, maybe you are really going for an all-over look that has like-sized drawings evenly covering the canvas/paper. Think of Where’s Waldo. (That sounds crazy, right?) But Where’s Waldo drawings are done in a way that uses all the same line weight, even spacing between elements, and like-sized elements. This is done purposely so that no single area draws your attention more than another. It makes it hard to find Waldo! If that is the look you want, go for it. That would be a very calming composition. But if you want a strong focal point and maybe a few mid-sized areas that are interesting as well, vary your scale and spacing.

Contrast – Think about what black lines will look like vs white on your painting. How will they alter the mood of the painting?

Line Weight – Do you want a thick line that is bold and graphic? Or do you want thin lines that are whispy and light? Maybe a combination of both would work best? That is for you to consider and decide. Here are some great examples from the “Doodle Stage” of some of my Kids Collaboration Paintings. They really illustrate some of these points beautifully. Go Kids! 
WEEK 4 – MONDAY EXERCISE – WORKING LARGE TO SMALL

Click above t0 watch the video demo – password: painteveryday
This is such a great exercise that highlights a principle i use in all parts of my artworks. “Start Big and End Small.” This rule never fails me. And anytime i stray from it, i end up disliking the end result. It’s not like i made it up. i’m pretty sure it’s a very logical way of working. But i DO find that folks who haven’t been making art for long (and me too sometimes!) can find themselves hung up getting say, ONE FLOWER perfect or concentrating all their energy on ONE EYE in a portrait before they’ve actually roughed in the entire composition. This almost never ends well. Inevitably, that one flower is labored over to the point of being flat. That one eye might be nicely done, but the face you draw around it never quite has the right proportions. When you rough in your largest elements and shapes first, then work in mid-level detail and end with the tiniest touches, it’s way easier to maintain a similar hand and “touch” across the whole piece. It’s easier to see it come together and be able to judge what else is needed to make the art complete. In today’s exercise, i am going to doodle. Give the people what they want, right? ; ) i start with my largest elements and then gradually build up around those to completion. Not EVERY area of the canvas will get touched. Strong sections of the painting will stand alone. It really is easy when you take it step-by-step. And anybody can doodle. So i know you are all going to rock this one! i cannot wait to see!
WEEK 4 – TUESDAY TECHNIQUE – BABYSTEPS TO AN INTRICATE DOODLE

Click above to watch the video demo – password: painteveryday
To my mind, doodling is not as high on actual technique as it is on creativity and patience. But there is one technique to creating impressive doodles that pretty much anybody can master. It’s pretty simple. It is the systematic application of many, many, MANY baby steps. What’s that saying? “How do you eat an elephant? One bite at a time.” When you look at an intricate doodle with seemingly endless detail, it is easy to feel daunted….like you could never pull that off. But in today’s demo video, i talk about how starting with simple shapes and a very repetitive process of adding small shapes, you can crank out something that is pretty “wow.” The sample doodle is a round medallion shape called a mandala. It is an meaningful symbol in eastern religions and it is said that the mere process of creating one can be a very meditative experience. i’m not sure if that’s why i like drawing them, but i really do! Round shapes are my “go-to,” in general, so it’s a no-brainer that these would be a favorite of mine. You essentially start with a small circle and build outward layer by layer, adding repetitive details of all kinds in a clockwise or counter-clockwise direction as you go. You never hover in one area for long, but continue to add evenly around the circle. i like to challenge myself to use as many different shapes as possible in the details and try not to use any one motif more than twice. Try it! You can cut a stack of watercolor paper squares and paint several at a time with swishy, circles of color. Then grab one anytime you have 20 minutes to spare. You will end up with a great assortment that can be framed and hung as a collection, or given as gifts for a special occasion. It’s special to create one while thinking of a particular person. i think it sort of becomes personal to them somehow. : ) So go make some stunning mandalas everyone! The Flickr group is popping with beautiful artworks and i can’t wait to see some more.
WEEK 4 – WEDNESDAY PLAY – BE AN ORIGINAL

Click above to watch the video demo – password: painteveryday
For today’s play with doodles, i thought it would be fun practice to use some of the tips on contrast, scale, line weight, etc in a simple leaf-inspired doodle. Each leaf must be doodled in a unique way. That is your challenge! This play exercise will also serve double duty as a starting point for one of our color exercises next week. So make sure to keep it! Start today’s artwork by creating a very simple monochromatic background painting. Concentrate on a light palette or a dark one. If you choose a dark palette, you’ll doodle on top in white. ‘if you start light, you will doodle in black. *note- a light background will give you more flexibility when we get to color next week, because some of the color-techniques are transparent, and will be more visible on a lighter surface. But it’s your choice. Use your imagination, doodle plaids, stripes, florals, dots, chevrons, swirls. Fill your leaves with variety and have fun! Wednesday is the day to experiment and play : )
WEEK 4 – THURSDAY ART SUPPLY EXTRAS – SOURCE MATERIAL
i thought really hard about what art supply extras i could share with you today on the subject of doodling and inspiration. The whole beauty of doodling is that the materials needed are simple; pens, pencils, markers. But then i realized that the best “extras” when it comes to creating patterns and designs are come from our HISTORY & ENVIRONMENT. Source books that show ancient architectural details, scroll work, decorative carvings, embroideries, tapestries, fabrics, illuminated text, and calligraphy are all truly inspiring. Nature books (or the outdoors, themselves!) are full of beautiful symmetry, shapes & patterns. It’s easy to fall into a rut of drawing the same shapes over and over, (Lord knows i do it!) but you can infuse a whole lot of fresh shapes into your work by digging into the stacks at the good old library or book store, or visiting your local nursery/botanical garden with a camera in-hand. As far as books go, Dover Publications has lots of great books of botanical drawings, cartouches, victorian ornaments and more that you can find on amazon.com i have this one (below) and like it a lot! : ) Happy doodling!

WEEK 4 – FRIDAY IDEAS + Q&A
Hope you’ve all enjoyed Doodle Week! We have just one more week of instruction and then we close out week six with a painting challenge each day and the workshop summary/review! Today’s bright idea for doodling is super fun. i’m going to show you first. This one is easier shown than explained:

It’s a doodle-y sort of seek n find! Doodles with meaning and quirk and a personal touch. In Creative Doodling & Beyond, i shared a project for creating a Family Seek ‘n’ Find, but this one above is more stylized. You can give it lots of meaning if you fill the doodle area with things that are very special to the recipient. With this inspiration, i encourage you to add meaning to your doodled artwork. Whether you are doodling over watercolor or on canvas, you are only limited by your imagination. Tuck a little cupcake drawing into your doodled birthday card for your friend who loves to bake. Paint a beautiful abstract canvas covered in doodled flowers, then add a few doodled ladybugs for your best friend who collects them. If you want to go all out and create a jam-packed doodle cluster as above, pick a meaty subject. Maybe you could paint a watercolor and then doodle a design full of symbols of your parents’ 40 years of married life?How special and cherished would that be? Somebody told me once that i seemed to always be personalizing my art. i think they questioned whether that would make it less commercial or sell-able. Maybe. But for me, art IS personal and i live for the moments when i give a gift that touches somebody’s heart. No way i’m going to stop doing that. So show me your doodles everyone! The Flickr group is such a happy part of my everyday. It is getting so full of beautiful art. So keep it coming!
Q&A
i hope you will all forgive me for typing out the Q&A today. There was only one question this week! A video seemed a bit over the top for just one, right? But it’s a good question. Read on.
Q: What type of scanner do you use to scan your paintings? Do you purposely paint smaller when you know you will be scanning? A: i actually only scan pieces that are 12×12, 11×14 or under. i won’t do more than one seam, usually. Meaning, if i have to piece 2 scans together in Photoshop, that’s fine, but i won’t do more than that. i have an Epson Perfection V500 Photo and like it a lot. i love to paint large. i rarely let scanner constraints guide my size choices. i photograph my large canvases using a tripod with a bubble level and a straight level to check the canvas for plumb. (perpendicular to floor). i use indirect natural light and full spectrum softbox lights. There is still a small margin for imperfection, of course. But because i’m painting colorful abstracts that don’t really suffer much from any slight keystone effect, like a portrait could, i’m pretty satisfied with my results. Any small tweaks i might have to make in Photoshop are fine by me. If i had to do a digital image capture of the Mona Lisa, well then, i’d hire a pro. : )
OH!! and here’s an extra close-up video showing the brushstrokes i used in my floral. Hope this helps those who asked! ; )
WEEK 5 – COLORING THE DOODLES (LAST LAYER!)

Click above to watch the video demo – password: painteveryday
Last week we added doodles to our paintings. That can be the final step in many cases. Or, if you love excess on occasion, as i surely do, you can add more color! Yep, this week, we will be exploring all the ways you can add color to your doodles…inside the lines, outside the lines and over the lines. It’s a color explosion! i have been busy making new base paintings & doodles for the demos this week and there will also be a few appearances of art from previous weeks, that i will take to the next level. i’m going to work on acrylic “coloring” first, and then move into watercolor. The basic coloring techniques work for both, but breaking it down is easier to understand, i think. Here we go!!
ACRYLICS

Click above t0 watch the video demo – password: painteveryday
Minding the Lines Coloring Book Style – filling with flat color


This is a no-brainer. Of COURSE one of your options is to use flat color to fill the different areas of your doodle. But there is actually good reason to go this route sometimes. If you’ve doodled over a super-busy area of your painting and the background is really fighting with the doodle lines, you can clean and crisp it up by choosing a color very compatible with the background painting, and filling it in.
Transparent “Stained Glass” Look
![]()
![]()
If you want to preserve a beautiful section of texture from your background painting, but ALSO want to color in the doodle that’s covering it, you can go transparent. Several acrylic colors are transparent-ish by nature. Yellows and oranges are prime examples. Yellow-ish greens and orange-y reds too. So you can use one of those colors right from the tube. You can water down colors a touch to get a bit more transparency, you can add zinc white or you can add glazing medium. Remember all these handy tricks we learned back in our acrylic lessons? Using transparent color is a great compromise that will let you enjoy the best of both worlds; the textures of you background will still be visible and the focal elements of your doodle can still be unified with color.
Coloring Outside the Lines- Halo effect & Shading Effect

A great way to make a shape pop off your background, is with a soft, fuzzy halo effect. You need slighty watery, light colored paint and some patience. At least the way i do it! i like a transparent, blendy effect that is not thickly applied. You can make a halo with thicker paint and blend it out with a blender brush, or just use your fingers a little. Here’s how it goes. You have to move fairly quickly. You’ll get a feel for it. i water down my halo paint color to a milky consistency…i’ll say a 1% milk. Use a flat brush to stroke the color gently from the edge of your doodle outward…feathering it out as you pull the brush. i’ll do maybe 3-4 strokes and let them sit a few seconds before i go back in with my fingers. You want the paint to have a second to start to stick to the canvas, but if you wait too long, it’ll start to dry. Like i said, you’ll get a feel for it after a few passes. After a few strokes, i will go back in with my fingertips, and sometimes a soft, dry brush, and sort of rub and burnish the paint into the canvas texture and wipe some of it off. Shading is basically the same as the halo effect, but with a dark color. It is also more forgiving, because darker colors generally are. i use a shadow effect when i want to add richness and depth. Sometimes i will use a sepia colored glaze or watered down sepia paint and it really warms the painting up and gives it a vinatgey sort of feel.
Highlights

Just a little pop of white or other bright color adds a great highlights to shapes at the very end of a painting. i try not to be too precise. Add dots or follow the curves of certan shapes that could use some brightness. Go with your gut and work quickly and confidently so your swipes and dots of paint are not hesitant and wobbly. If you paint over an outline a little smidge, all the better. This is a great finishing touch to give balance and brightness to your final artwork.
Coloring OVER the lines – Overlapping Color Drips and Blobs

Using glazes or transparent paint to add chunks of color overlapping your doodles gives a great sense of depth and can be a very simple way to balance a painting that might feel a bit “heavy” with color on one side more than another.
Touches of Texture

i really love adding little “schools of fishes” in my last layer of color. They are just clusters of little oblong brush strokes scattered across the painting, overlapping doodled areas where they may. i choose either a compatible color to my color scheme, or a totally quirky and unexpected one. It really changes the personality of the painting and gives a lot of depth!
Even More Doodles

Yep, the last way i add color on top of my doodles, is with more doodles. i will usually just add a few geometrics or very light bits of line work. i will often do those lines in color with a tiny brush. There is something special about colored doodles in my paintings since my main drawings are in black or white 90% of the time. Throwing a few lilac triangles or circles on there just makes me think of Alice in Wonderland.
WATERCOLOR

Click above to watch the video demo – password: painteveryday
Watercolors are a whole different animal when it comes to coloring on top. You can really go crazy. i like to sit at my drawing table with all my supplies around me and just grab whatever feels right. There are more options than with acrylics. You can go with colored pencil, pastel, watercolor pencil, marker, gel pen. Or you can break out your paints and take advantage of watercolor’s build-able nature. This is one of my favorites. As long as you’ve used good permanent ink for your doodles, you can add washes all over, or be meticulous coloring inside the lines. Bits of gouache make great graphic accents, since they are opaque. Just sush a flexible medium!
Minding the Lines Coloring Book Style – filling with flat color


Again, this is an obvious one. Color in your doodled shapes with pencils, pens, paints, etc. You get it!
Building with transparent layers
![]()
![]()
Adding layers of watercolor is great fun, It’s like dunking your easter egg in red after it finishes in the yellow. Yay for orange!. You can really use the transparency of watercolor to your advantage this way. You can also deepen pastel colors by adding a 2nd wash. That makes for some lovely tonal effects. You can build a stunning painting with just a couple colors by stacking layers and building up your tone and saturation.
Tonal Texture 
Use a gel pen in a shade just darker than the section you are working on, and create pattern. You can use green gel pen over an area of pale green watercolor to make polka dots. Use orange gel pen to draw zigzags over orange watercolor. This tone-on-tone technique gives tons of texture without altering your overall color scheme.
Coloring Outside the Lines It’s OK to Be Negative

i like to doodle in an intricate fashion over watercolors and this usually leaves me with lots of interesting negative space outside my doodled shapes. It can be so dramatic to fill in the NEGATIVE space with color and texture in the final layer, rather than focusing on the inside of the shapes. In that way, you force the negative space to recede with it’s darker tones and the light areas inside your drawings pop forward. You can fill the negative space with a wash of color, or with textures, both to interesting effects.
White Lines


You can “lighten” areas of color that surround your main doodle by covering them in thin, white lines. The brightness that the allover white work gives makes those areas seem to fall away and forces focus to the doodles. This is a really fun experiment to try. You will surprise yourself with the effect. The doodles don’t even need to be fancy. Repeating arches or wobbly, radiating lines will serve the purpose just fine.
Outlining

When you draw on watercolor with black ink, it’s striking in its starkness. But you can add a pop of color by giving certain doodles an outline. i will often use gel pen to outline star shapes. Or, i’ll use watercolor pencil to give more of a bleeding effect with the outlines. It’s a subtle way to add color without adding further design elements or new shapes. Coloring OVER the Lines – Overlapping Color Color overlaps are the most fun in watercolor because of the transparency. The only rule is to let the bottom layer dry fully before you paint the top one. This will ensure very “clean” color layering and avoid muddiness. You can pretty much paint an entirely new piece over your background layer and just enjoy the depth and color blends you get in the process. Watercolor rocks!
Textures


We covered this in week one. Remember the different lines, dots, chevrons and such that we painted? Yep, paint them again. Use color in your top layer that will create rich overlaps. When in doubt, yellow is pretty universal. It will change the colors beneath it (blue to green, red to orange), but won’t be frighteningly bold on it’s own in your composition once added. And of course, you know i like to throw blobs of my favorite hot pinks and corals on top of practically anything. This is also a great time to use pale neutrals. Adding texture with these colors is subtle and basically just darkens the lower layer, so you get a tone on tone effect.
More on Neutrals

In addition to adding tonal texture by layering neutrals over color, you can add washes of neutrals. A wash of a neutral color that party overlaps your base colors and party sits on bare paper is a great …..um, neutralizer. i know that sounds redundant. Here’s what i mean. A Neutral colored wash, think pale sand color, dove grey, watery slate blue, adds a subtle sophistication that can temper an otherwise crazy-bright painting. Seeing all the bright color tempered with muted tones can be the difference between a painting that looks fit only for a very juvenile or whimsical space, to one that would also be great in a more sleek and chic space.
Drips and Blobs

Add a spritz of color from your toothbrush bristles over a painting to add a punch of movement. Lay in a few amorphous blobs of color to unify a painting that looks a little lost or disconnected from one element to the next.
WEEK 5 – MONDAY EXERCISE – PRACTICING THE COLOR TECHNIQUES

Click above to watch the video demo – password: painteveryday
Remember last week i told you to save your leaf art? My plan was to paint it using this weeks lesson. I painted the whole thing and realized i hadn’t pressed RECORD on the camera. #facepalm, right? i blame the sudafed i was on. Sorry! SO i came up with plan B. I used one of the other doodled paintings from the course and colored IT instead. SO YOU ALL can feel free to use whichever base doodled painting you like. The CHALLENGE is still the same. Use at least 3 techniques discussed in the main lesson to achieve your finished piece. Combine stained glass, halo and dots, or maybe coloring book style, highlights and touches of texture. You get the idea. Or make up your own, unique method for adding this final layer of color. As always, i recorded my Monday Exercise for you to watch and get motivated. (above)
WEEK 5 – TUESDAY TECHNIQUES – LAYERING WITH STENCILS
A great way to add texture with paint is to skip the brushes all together and make some artful stencils and Liquitex artist-grade spray paint. And no fair buying pre-made stencils! Just kidding, pre-made is ok if the art is for you, but i don’t like to use anyone else’s designs for work i sell. Besides, you can inject so much personality by making your own wobbly, quirky stencils in your own style. And you can do it for pretty much zero dollars.

i just use heavyweight paper or cardstock. Heavyweight paper is easier on your cutting hand! i cut my shapes freehand with my trusty x-acto blade, without sketching them first. But you can absolutely sketch first if you like. For round shapes, i use that lucite cylinder tool you see in the photo. It’s called a Blade Runner and has a teeny, swivel blade that lets you cut a circle just the same as if you were drawing it. You don’t have to rotate your paper. Super helpful when cutting lots of dots! i use a much larger page than i need so that it catches the overspray of the spray paint.

My son made this great textural background a while back. Isn’t it great!? i placed the stencil and sprayed very lightly with the canvas laying flat. Because i don’t use stencil-tack or anything to adhere the stencil tight to the canvas, it’s good to let gravity help pulling the paint spray straight down through the holes of the stencil. You still get a touch of a hazy edge in places, but i actually really like the softness.

Here is our canvas with two of the stencil motifs added. Pretty, right? Now, you can paint over this with more layers or leave it as-is. This paint is made for artists, so it is compatible with other acrylic paints. It is very low odor, but of course, ventilate your space, open the windows, or work outside to be safe. : ) Note: You can use stencils with a pouncer brush or sponges too, if you like. But a paper stencil will get soggy with that volume of paint. So in that case, you might want to cut your stencils from acetate.
WEEK 5 – WEDNESDAY PLAY – SUBTLE COLORS IN YOUR VIVID ART
Despite my love for bold, saturated colors, i know the value and power of muted and offbeat colors as well. Colors that you can’t quite name are one of the things i can’t get enough of. The purse i’m currently carrying was chosen because it was such an oddball shade of green/jade/turquoise??? i couldn’t resist. Today’s play session is all about mixing and lightening and muting down those “straight-from-the-tube” colors to beautiful effect. Have fun playing!!

Click above t0 watch the video demo – password: painteveryday
WEEK 5 – THURSDAY ART SUPPLY EXTRAS – STAMP CARVING

The stenciling post totally got me thinking of how else i’ve gotten repeating patterns onto canvas in the past and inspired today’s post on fun extras; STAMPS! The proper term is probably “lino-blocks,” i suppose? But i’m a simple girl. Stamps is fine by me. i first bought a bunch of printmaking supplies a couple years back on a whim in the art store. Always the way, right? Since then, i’ve let the kids use the simple stamps i carved on various projects, including our canvas paintings. Just like with stencils, it’s a quick way to add some fun repeated surface pattern to your art. (Quick after you’ve carved the stamp, that is! The carving part can take a little time.) You don’t have to get fancy, start with some small, simple triangle and diamond stamps, and work your way up to florals or even letters? i used a carving material called EZ Cut for the turquoise stamp pictured. It does carve without much muscle, but it crumbles easily. The other one in the photo (not completely carved yet, just sketched in) is this mounted linoleum that is much harder. It takes more effort to carve it, but it gives much crisper detail. It’s mounted to a particle board “block” for rigidity, and ease of stamping. i typically put something smooth behind my canvas when i stamp so i don’t stretch out the canvas surface by pressing down. You can use inks for stamping, mix additives into your acrylics, or just go rogue, like me , and use plain old acrylic applied with a soft roller/brayer. Heck, when my kids do it, i just smooth a little paint onto a paper plate and let them be messy. It’s fun! i don’t worry too much about perfection. It’s all an experiment! i mean, i have an entire linoleum cutting tool set, but i still use my favorite wood carving tool (pictured) to carve my stamps. i think whatever works best for you and gives you the best results is A-OK. Carve some veggies and see how you like stamping. Remember potato stamps and carrot or celery stamps from when you were a kid? SO awesome. i wouldn’t recommend those for your paintings because who knows how those veggie juices will react over time, but for practice, it’s cheap and accessible. Go have some fun! Woohoo!
WEEK 5 – FRIDAY IDEAS + Q&A
Q&A First : )

Click above to watch the video demo – password: painteveryday
Here we are! The last Friday Idea. DO i have any ideas left? i think i emptied my whole brain these past 5 weeks – haha. Hmmmm….OK! i’ve got one. Since this week has been all about the last layer of color, the filling in of our doodles and ways we can pull it all together, here’s my idea. Go back and finish all of your experiments and exercises. i’m serious! i’m a big proponent of not letting half-finished artwork accumulate. Turn it all into something beautiful. If you have stuff you think is “ugly” go with the masking technique to cover up all but the best parts, then get it completed. If you have a piece whose colors just never came together, try tinting the most offensive areas over with transparent layers, watered down acrylic, colors mixed with zinc white or glazing medium, or dyes. Then get it completed. Doodle BIG over backgrounds you might not LOVE…but that have great colors. Then, those colors will just be a brilliant backdrop once you’ve colored in the doodles. Any artwork can be salvaged, i promise you. Post Before & Afters in the Flickr group! Amaze yourselves! Here is one of my before and afters.

i don’t hate the before as intensely now as i did then (i actually like parts of it quite a bit)…..but still. i was not in the zone. i was being indecisive and wishy washy with my choices and making a bit of muddy mess compared to the idea in my head. The painting sat for a couple days before i came back and hammered away some more to realize that pesky image in my mind. The painting was for a specific project/assignment. And can i tell you? i often overthink those types of situations instead of letting it flow. i think my best work comes out of the freedom to change gears mid-stream if i feel inspired. With assigned work, that’s not an option and can make me feel trapped. In those times, best to walk away. Come back when you feel fresh and positive again. i’ve never painted anything i like out of frustration.
So give one of your ugly ducklings (if you have one) a makeover. No art is wasted. xoxo
WEEK 6 – DAILY IDEAS & INSPIRATION
Here we are winding down this last week with simple posts each day to help inspire some ideas for painting everything we’ve covered.
MONDAY – WATERCOLOR SWATCHES AND DOODLES
Today, your inspiration is watercolor swatches and doodles overlays. Lose yourself in a page of swatches, large or small. Keep them simple. Let the watercolor do its thing. Don’t strive for perfection. Keep painting swatches until you feel loose and are really enjoying yourself.


Once the page is full, doodle on top. Doodle something new on each swatch. Or doodle one large design over the entire page.


Have fun painting!!! : )
TUESDAY – PHOTO INSPIRATION IN ACRYLIC
Today, your inspiration is Fashion or Floral Photography. Creating a rich landscape and developing an interesting color story is so much of painting. i’ve collected a handful of fashion and floral related photos on one of my pinterest boards. Here’s a screenshot below….just click to go there if you like. OR find your own inspiration on Pinterest, in magazines, in your own photo collection.

i used one of these images to inspire a layout/color story of my own. i started by laying in the basic colors that are clearly seen when you quickly scan the image….pale blue-grey and fiery orange/gold. Then bumped down in brush size and looked closer to see the nuanced colors in the photo…periwinkles, fleshy tones and hot reds/pinks. Finally, i bumped down to a very small brush size and added in one more layers of shades like turquoisey teals, peach and yellows….all highlighted by a few pops of white. Somewhere in the middle stages, you can stop referrring to photo and let your own intuition guide you. At that point, the photo has done its job and all the rest is artistic license. Can you do it? Give it a try!! Here’s a tip, when you scan for a great source image, squint your eyes a bit so you are seeing shapes and color, not subject matter. ALSO, don’t overlook subtle shades. That’s what i went for. They are underrated and are so lovely to play with. SO much can happen by adding teeny little drops of color to your paints when you play with subtle color. It’s addicting. You will love it, i think, and really appreciate the power of color after you are done. : ) Here is my painting from today’s challenge. Of course it has to be named “Sparkler.”


WEDNESDAY – MASKING IN MULTICOLOR

Layering is about being bold and brave with your choices…even when you feel like you might “mess up” your painting. So, today i’m challenging you to creatively mask off a painting (always scary) in multicolor. This will create a rich mid-layer that you can add onto to create a final artwork.
Be thoughtful in your process. Take your time. Paint a background with a strong color scheme and then systematically mask off some beautiful shapes and fill in the “gaps”. If your background is on the darker side, mask in light tones and vice versa.
In my painting, i chose colors from the same color families as the background for the masking, only lighter, so that there would be contrast. THIS IS A CHALLENGE. i don’ think i like the right side of mine all that much! haha! But remember; the beauty of layers is that you always have the option to simply choose the prettiest parts to remain and paint over the rest in your NEXT layer. i will totally be doing that!
Be FEARLESS! Push yourself. You can do it!
THURSDAY – DOODLES IN OVERDRIVE

Today’s challenge is about pushing your doodles to the next level. The inspiration piece i created for you is this canvas full of color, layers, doodles (in both black and white) and…..a portrait! Now, if you’re thinking that you cannot possibly draw a portrait, don’t worry. You can cheat a little if you want. i personally LOVE drawing people! But if you don’t, you can make a tracing of a face, and just adhere it to your canvas before you begin. Use matte medium to attach the print and you won’t have any issues with the acrylics being compatible with the “glued down” section.
The actual drawing of the portrait isn’t the focus here anyway. The challenge is to work with a focal point and doodle around it in a way that highlights and magnifies it. If you’d rather choose a different focal point, go for it. i just happen to adore portrait pieces. : )
In my example, i drew a face with an expression of hope and wonder, then created a halo of doodles and florals to highlight that concept. Use all your skills here. Layer those doodles! Change up the scale. Include a variety of shapes and motifs. Use both black and white…and even colored doodles. Step back and look for balance as you work. Make it your masterpiece. Add doodled words if you like.
Don’t rush. Immerse yourself in the systematic addition of layers and textures until you LOVE what has emerged.


FRIDAY – EVERYTHING BUT THE KITCHEN SINK

i really thought about what this final challenge could be….what i wanted to leave you all with…..
Here it is. It’s a practice painting – sort of. i’m calling it Everything But the Kitchen Sink. It’s kind of not ever meant to be “finished.” i want you to have a freedom with it. Have the mindset from the start that it will never need to be called “complete.” Try colors you don’t normally gravitate toward (for me, pastels). Try every technique you can think of (i did a wet into wet background, a glaze layer of whites and greys. drips, all sorts of brush strokes, doodles, coloring of those doodles, dyes, paint pens…..) Make it a canvas where you aren’t afraid to wreck anything. Where any experiment you dream up is fair game.

It is an exercise to challenge what is SAFE for you and try new things in odd combinations. A place to put olive green next to royal purple if you feel like it. A place to completely paint over the stuff that you hate and not care.
You might come out the other end with something you love. But that is not the point.
This was a tough one for me to try to demo, because i was way too conscious of trying to show you the zillion tons of mish-mosh i chucked in there. haha. Consequently, i do not love my outcome. i do my best work when i have no agenda, after all. But then i thought….perfect. This outcome being less than my fave is actually exactly what i was going for! Three cheers for overdoing it and wanting to cover it all up and start over again! HA!!
Besides, starting again is always the best part.
Hope all of you guys will keep on starting again….and again and again.
Thanks for taking my workshop! i hope you had a lot of fun and pushed yourself to try new things. Have fun painting! xo,s